My niece turned two end of march and for her birthday I gave her my first altered piece ever! I had such a huge response to the letters from family and friends on the distressing and vintage feel I was truly overwhelmed as I have only done two vintage type pieces ever! For the letters, I picked them up from the local flea market, you can also find them at any craft store. I painted them brown then cut out the letter shape. I distressed everything I worked with using distressed ink, crackle paint, sander, and files. I hand made the large flowers and layered several embellies in hope to give more of 3D look.
I have also had an unbelievable about of complements of my flowers and so many people email or ask how they were made so I decided to make my first tutorial (so please be kind armature here!). I originally found a 3 piece video on youtube on how to make it (I have lost the link will update) so I took pictures as I went to show you the steps.
Here are the supplies you will need:
1.Packing Paper (brown or cream)- you can use butcher paper or go to home town pottery and they use it to wrap your breakables in
2.Circle cutting tool -I am using Creative memories
you will need 3 different sizes
3.Embossing pad, large background stamp -you can use smaller it is just easier to use big one
4. Embossing Powder
5. Heating tool
6. Glimmer mists
7. Flower centers (gems button, glitter)
8. Glue Dots
9. Hot glue gun
First you need to cut 3 circles in decreasing sizes
*if using the lighter paper it is really thin so it tears super easy, don't worry it is fine
Next you will need to stamp the circles with embossing ink, apply powder and using your heating tool heat the powder.The image does not need to be perfect the messier they are the better!
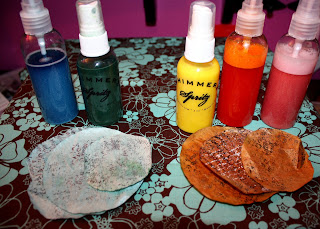
Once they are completely cooled (if using distressing ink make sure you get the release crystals off before this step by rubbing the circle with your finger) Spray them with which ever mist you would like. Generally for lighter colors I use the lighter paper and for darker colors I use the brown paper.
If you want a darker color, multi color, or blend several to make a new one Spray one color then dry completely, then spray the next color. Repeat until desired color is reached. Here are the colors I used and results
Here is the fun part! Scrunch it, crumble it, roll it...destroy it, then open it but do not smooth.
*do this to all of them before continuing.
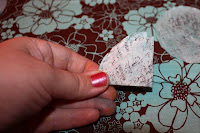
Now you want to fold the circle in half, then in again, and again. While folded pinch the bottom of the triangle and hold here.
While pinching the bottom, start to unfold and open the flower. The point is to have the pinch remain to use as the center of the flower... if you get this right simply place it on a glue dot. (I have a wood circle I like to use from a bag at Micheal's of wood shapes, you can use cardstock and cut it if you like)
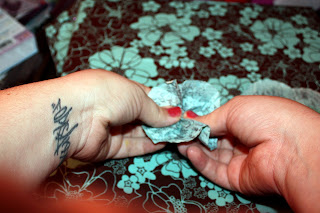
This is the hard part, I have yet to master it, so I have a trick for you if you can't get it either!!! Once you open the flower and your "pinch" has fallen apart grasp the flower like I am here, cradle the bottom while pinching you fingers to the center as you place it on the glue dot. If you are still unhappy see the next picture. Here my layer didn't look right so I pinched the center squeezing the paper into the glue dot while turning it to give it the scrunch look NOTE: this will only work if you use sticky glue dot or similar product, liquid adhesive takes to long and hot glue gun tend to dry to fast
Then repeat the steps for the next two layers, play with it until it takes the shape that you like, it is your flower so make it yours! Once you have finished the layers, I use my Cat's Eye Liquid Chalk to ink the edges, you can use any ink really. You can either use coordinating color or contrasting, or go with color to match your distressing powder...or the always faithful brown.
Now it is time for the center, again this is another "you" moment you can add what ever you like to either match the flower, your layout or just your style in general. I have two examples here of my favorites... I use the large gems alot, also if I really want it to match and I have nothing that will...my tusty old Martha Stewart glitter pack usually has something close enough and with glitter the color changes in the light so it can blend better. I have also used buttons as well as stickers. Again it is a "you" moment here.
If you use the glitter, my opinion is the hot glue gun works best for this. I have used the glossy accent and a liquid glue here as well and it takes way to long and doesn't have the enough height for me. Same with a glue stick or runner no dimension to it.
At this point you are either done or continuing your "you" moment, sometimes I go back and ink the layers more with a slightly darker shade or I use stickles to edge them. A really neat look for more simmers, I make a draw a line with the stickles on the smallest circle all the way around the smear it through the layers to give a touch of color and shimmer!
And wall-la you have your flower! Here are some of the ones I have used in the past as well as my finished product from this tutorial...
Ok so YAY my first tutorial! I hope it was easy enough to follow. let me know if you have any questions!!Thanks for reading!
Tuesday, April 6, 2010
Subscribe to:
Post Comments (Atom)


.jpg)










3 comments:
What a greay tutorial, Rane! TFS!
Thanks for sharing how you made this! I am going to have to give this a try
Vieve - Design Diva @ Ch{all}enge Masters
Great tutorial and super cute results!!!
Post a Comment