Saturday, July 31, 2010

Chillaxin

I finally had a chance to scraplift one of the amazing lip stick chicks Ana White over at XOXO's Girls Blog for Challenge #11 sponsored by Lucky Girl Crafts. I chose my favorite Summer photo of the boys they were laying with their heads on the back of their little blow up pool...I took the picture and said to them "Boys you two look like your Chillaxin" I totally flubbed Chillin and Relaxing but I loved it! So thus the title!

"Chillaxin"

Thanks for lookin!

First Day of School...

So not that anything has actually slowed down around here I just pulled an all nighter to scrap because I REALLY needed it! I knocked out 2 layouts and 5 cards but gave the cards away without taking pictures! BOOO anyway I used Sketch #73 from The Scrappiest my favorite place for sketches! This is the boys on their very first day of Summer Pre-School, it was their first experience ever at school and they had a blast! I can't wait for Fall Semester!
"1st Day"

Thanks so much for looking~!

Sunday, July 25, 2010

Junk Mail Envelope Accordion Album Tutorial!

How many of get junk mail? I am not talking about spam either, I am talking old good ole' fashion unwanted snail mail. Over on the message board at Scrap Attack Scrapbooking Lauri got us talking about junk mail and what we all do with it. My mouth hit the floor to find everyone either shreds, recycles or just plain tosses it...I was like for the love of all thrifty scrappiness stop! I vowed to make a tutorial to share how to make an accordion junk mail envelope album that I had learned to make a while back. I literally had an hour to make this and no one to take pictures but it is so easy you should have no problem following along if you do just let me know and I will explain further!

Alright then here we go!
You will need: 5 Junk Mail Envelopes (same size)
Scrapbook Kit Cardboard or Chipboard (2-5x5)
Coordinating Paper
Ribbon
Adhesive
First, you will need to seal the envelopes with your adhesive. 
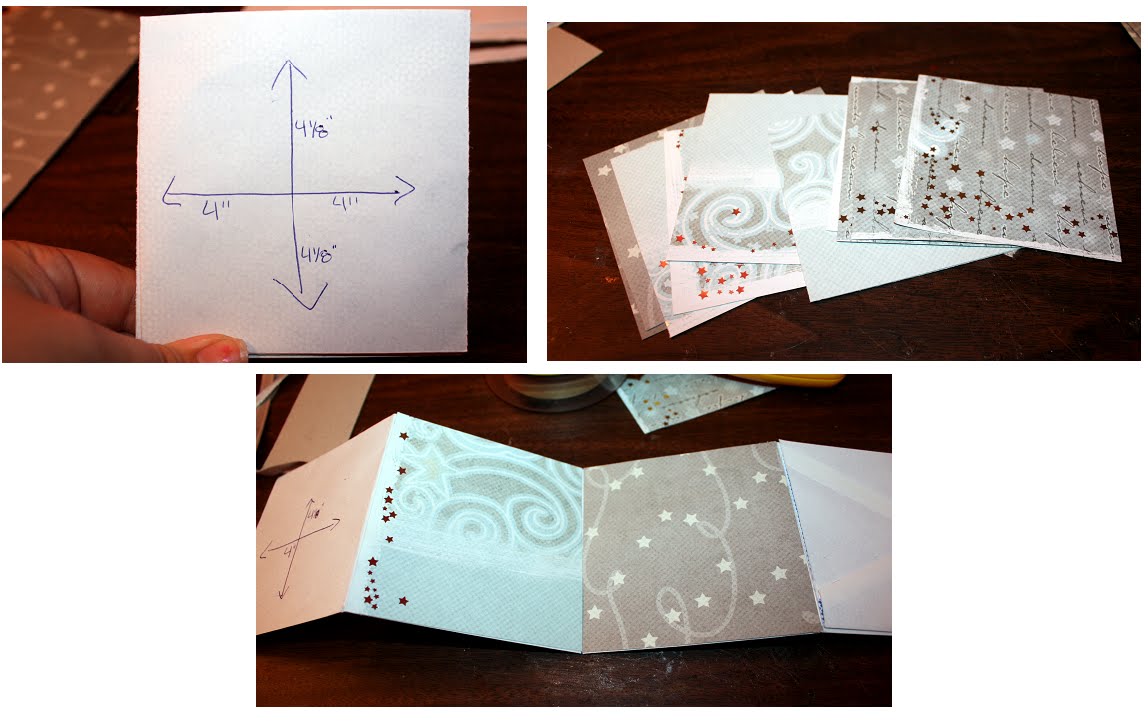
Then using a ruler mark the half way point on your envelopes, because they come in many sizes make sure you check yours as measurements can vary!
Now using your half way mark as a guide line it up on the 4" mark on your cutter and trim each "side" to 4" making your envelope now 8"
Now that your trimmed you will want to fold your envelope in half it doesn't matter which way you fold it can be flipped everything gets covered.
Once you have them all folded, you can begin adhering them together in an alternating format. *Notice on the first picture I labeled the folds where the envelopes crease is, you want to alternate the side the fold is on right, left, right*
Continue alternating and adhering until all 5 are together making your accordion.
Now we will make your cover by taking your board and cutting it to 5" by 5".
Pick out your paper for your cover and back you will cut this to 6" by 6"
Once your paper is cut you will adhere your cover to the back leaving equal amounts of space on all sides.
Carefully cut each corner at an angle leaving only a tiny piece of paper at the 4 points of the cover.
Repeat steps for back cover.
Using a glue runner, run along the complete edge of the back of the cover and don't worry if it is thicker than the fold it will all be covered.
Once you finish putting glue on fold each side over to cover the sides of the board as in the second picture.
Now you will cut out your backing for your cover. I like for some of my cover to show so I cut mine 4 3/4" by 4 3/4" you can do it this way or cut it 5" by 5" just like the cover. Adhere to inside of cover.
Repeat steps for back cover.
Now you need to measure your folds, mine were roughly 4" by 4 1/8" you will need to double check yours. If you only used 5 envelopes you will need 10 pieces to cover you pages. Adhere them in alternating fashion so each page is distinct from the last.
Take your ribbon and cut it into equal lengths, the thicker you plan to make your album the longer it needs to be. If you plan on doing any bluky embellishments like flowers I suggest no shorter than 20". Glue the ribbon either from top to bottom or side to side.
Once you have the ribbon down you can adhere your front page to the front cover and your back page to the back cover.
You now have an accordion album! The best part is it doesn't stop there! You now have pockets on each side to add tags or pictures to, the possibilities are endless!
Well, I hope you enjoyed the tutorial, I know there are a million out there and each a little different from the last, this is the easiest for me and I hope it was for you as well! I would love to see what you make if I perhaps have inspired you to make one!!

Thanks so much for reading!

Friday, July 23, 2010

I'm a Posting Slacker...please enjoy the video :)

So I am so soooo sorry for lagging on posting I have just been super busy but I promise to have some fun stuff up this weekend! To keep you enteratined please oh and ah over this adorable video of my youngest Edward this morning on the way to school!

Sorry it is sidewayz :/

Just for you Marda!

Friday, July 16, 2010

Hippity Hop..this is your next stop on the {SAS}sy Blog Hop!

Alrighty ya'll I see you have made it to my blog today so welcome welcome! If my blog is the first place you have visited you may want to hop on back to the start of the {SAS}sy Blog Hop by visiting Scrap Attack Scrapbooking so that you don't miss any of the great stuff the {SAS}sy ladies have to share with you!

Today I wanted to share with you an altered book that I created for my father in law to put his wedding vow renewal pictures in of he and his late wife.

While browsing through the {SAS}sy store I came across these fabulous Cherry Art Rub-ons that just so happened to be on sale and I thought they would be great for the album cover, I however have always been terrified of Rub-on's but let me tell you these Cherry Art Rub-ons came off so easily and complete they could have been clear stickers! It was easy as pie!
Making an album for a man about love at first seemed scary and almost impossible but when I saw Glitz Designs Distressed Couture Line I knew it was the perfect line that could be both masculine and elegant, romantic and edgy and boy was I right! 
The Distressed Couture Line is the perfect mix of colors and patterns that can make anything dramatic and dark or elegant and touching with varying floral, striped, chain, dotted and solid prints!
 To create a more masculine look on some pages I decided to use my Making Memories Edge Scrapper Tool to distress the edges then I added some ink.

Glitz Design Distressed Couture's line starts at only $0.69 and is 10% all day everyday just like everything in the {SAS}sy Store so make sure you get some before they are gone!

Scrap Attack Scrapbooking will be donating prizes from all comments left on all participating blogs so make sure and comment so you are eligible to win! As a {BONUS} there is a hidden word on each blog that can be pieced together to make a familiar {SAS}sy phrase. If you can unscramble the words to make this phrase you could win a $50 gift certificate to the Scrap Attack Scrapbooking store. For more details on the prizes, please see the Scrap Attack Scrapbooking blog.
 
Here is your word: "to"

Hopefully you're enjoying the {SAS}sy Blog Hop this week, I know I have been! Your next stop on the blog hop is lovely
Peggy make sure to stop by her blog tomorrow July 17th for some more great {SAS}sy products!

Wednesday, July 14, 2010

{SAS}sy Blog Hop has already begun!

We're hoppin' this week...blog hoppin'! The 2nd annual {SAS}sy Blog Hop has already started so make sure you check it out!

Start at Scrap Attack Scrapbooing's Blog : here

It is all week long each day a new {SAS}sy contributor so make sure you play along and come back each day for some great {SAS}sy products!

And I will see you back here on the 16th!
 

blogger templates | Make Money Online